A Deep Dive into Extensible State Saving
2019-03-19 • Márton Braun
This piece serves three purposes:
- Correcting a mistake I made in my original article covering ViewModel saved state, although this will actually have to wait until the end,
- Looking at how how extensible state saving is implemented in the AndroidX libraries,
- Seeing how ViewModel state saving specifically is hooked into this system.
A note before we jump into things: I’ll be showing code from the relevant AndroidX libraries, however, these snippets will all be simplified for clarity’s sake. This means that safety checks might be cut, variables may be renamed, etc. I promise that the relevant parts were kept the same, to the best of my ability.
SavedStateRegistry
The main component we need to familiarize ourselves with is SavedStateRegistry, everything else will be built up around this class.
The duty of this class is to keep track of a collection of SavedStateProviders, each of which it allows to contribute to and restore from saved state. SavedStateProvider is a very simple interface: anything that implements it can be asked to provide a Bundle of state it wishes to save.
public interface SavedStateProvider {
    Bundle saveState();
}
Each registered provider has to have a unique key. This key is how the state they’ve contributed to saved state will be identified, as we’ll see soon.
private SafeIterableMap<String, SavedStateProvider> mComponents =
        new SafeIterableMap<>();

public void registerSavedStateProvider(String key,
                                       SavedStateProvider provider) {
    SavedStateProvider previous = mComponents.putIfAbsent(key, provider);
    if (previous != null) {
        throw new IllegalArgumentException(
                "SavedStateProvider with the given key is already registered");
    }
}
The method where state is then saved is performSave, which receives an outBundle parameter. This is the very same bundle that you get access to normally in your Activity or Fragment.
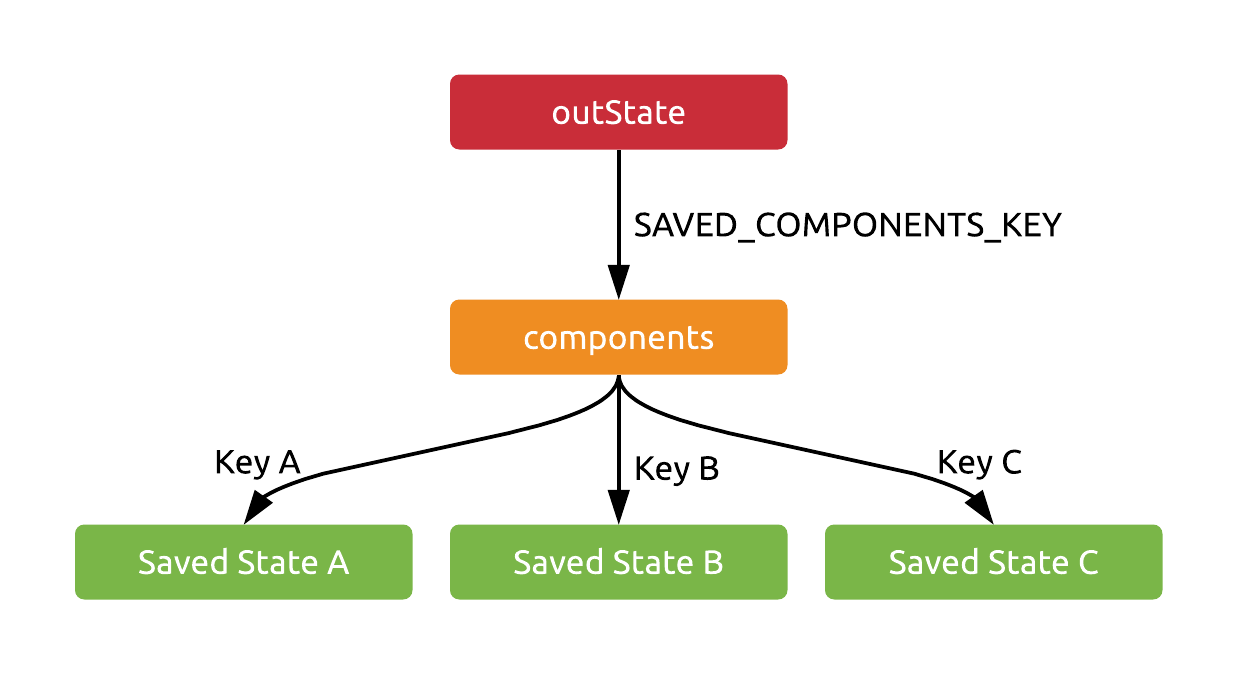
private static final String SAVED_COMPONENTS_KEY =
        "androidx.lifecycle.BundlableSavedStateRegistry.key";

private Bundle mRestoredState;

void performSave(Bundle outBundle) {
    Bundle components = new Bundle();

    if (mRestoredState != null) {
        components.putAll(mRestoredState);
    }

    for (Map.Entry<String, SavedStateProvider> entry : mComponents) {
        components.putBundle(entry.getKey(), entry.getValue().saveState());
    }

    outBundle.putBundle(SAVED_COMPONENTS_KEY, components);
}
A Bundle named components is created here, which will be placed in outState with a fairly unique constant key. This Bundle will then contain all Bundle instances returned by saveState calls on the registered providers, each Bundle keyed with the provider’s key. It’s Bundles all the way down!
As you might have noticed, our registry also stores an mRestoredState Bundle, which it dumps into components as well. This field is simply where it puts what used to be the contents of the components Bundle when they are restored. This is done in the aptly named performRestore method:
void performRestore(Bundle savedState) {
    if (savedState != null) {
        mRestoredState = savedState.getBundle(SAVED_COMPONENTS_KEY);
    }
}
Unlike when saving state, upon restoration, providers are not notified - their interface doesn’t have this capability anyway. Instead, if a provider wants to get the data it saved after it was restored, it has to ask for it by using the following method:
public Bundle consumeRestoredStateForKey(String key) {
    if (mRestoredState != null) {
        Bundle result = mRestoredState.getBundle(key);
        mRestoredState.remove(key);
        if (mRestoredState.isEmpty()) {
            mRestoredState = null;
        }
        return result;
    }
    return null;
}
When doing so, it will have to provide its key, and will be given the appropriate nested Bundle from mRestoredState. Notice that Bundles accessed will be actually removed from mRestoredState, and if there are none left, it will be set to null altogether.
It’s time for a story!
To recap and perhaps better explain what happens with especially mRestoredState throughout this process, here’s an analogy.
We are running a hotel. Guests may notify us upon arrival if they happen to have valuables on them (registerSavedStateProvider), in which case we jot down their names (key) to remember later.
Every night, when the guests are going to sleep and couldn’t personally look after their valuables (not being awake and all), we ask them each for their valuables (performSave). We assemble a huge box, so that these valuables may all be stored in it together (components), each item labeled with the guest’s name (again, the key). We then put this huge box on a truck (outState) which disappears into the night, taking everything to an undisclosed, but secure location.
The next morning, the truck reappears (performRestore), still carrying our huge box. We take the box off the truck, and we set it down in the hotel lobby (this box is now mRestoredState). If a guest comes by to claim their valuable, they have to tell us their name (key), and we take their item from the box and hand it back to them (consumeRestoredStateForKey). If the box becomes empty at any point, we throw the box away.
When nighttime comes again, we might still have a box left in the lobby with unclaimed valuables in it (mRestoredState != null). We should save these securely again, for the guests may want to reclaim them tomorrow, or even the day after. We assemble a brand new box again (components), but if we still have the box in the lobby, we dump its contents into the new box (components.putAll(mRestoredState);). Then we proceed as normal, asking each registered guest for any valuables they have for us to safekeep. And so on and so forth, day after day.
SavedStateRegistryOwner
As fun as that was, let’s get back to the technical bits. We have a SavedStateRegistry that keeps track of SavedStateProviders, puts their state in outState, and lets them access the restored state. Who manages this SavedStateRegistry and calls its performSave and performRestore methods?
Technically, the SavedStateRegistryController does, which is an extremely thin wrapper around SavedStateRegistry, and also has performSave and performRestore methods, which it just forwards to the contained registry.
public final class SavedStateRegistryController {
    private final SavedStateRegistry mRegistry;

    private SavedStateRegistryController() {
        mRegistry = new SavedStateRegistry();
    }

    public SavedStateRegistry getSavedStateRegistry() {
        return mRegistry;
    }

    public void performRestore(Bundle savedState) {
        mRegistry.performRestore(savedState);
    }

    public void performSave(Bundle outBundle) {
        mRegistry.performSave(outBundle);
    }
}
A controller like this is supposed to be contained by a SavedStateRegistryOwner, which is again a very simple interface:
public interface SavedStateRegistryOwner extends LifecycleOwner {
    SavedStateRegistry getSavedStateRegistry();
}
There are two provided classes that implement this interface:
ComponentActivity, a superclass ofAppCompatActivity,Fragment(the one found inandroidx.fragment.app).
Note: The equivalent of ComponentActivity in the old, non-AndroidX world would be SupportActivity, however that class doesn’t contain the features mentioned here.
It’s important to see at this point that you could implement this interface for your own custom components that have lifecycles, and use all this save and restore infrastructure.
We’ll look at the relevant parts of ComponentActivity now as an example - Fragment will be very similar in this regard. It contains an instance of SavedStateRegistryController, and implements the interface shown above by fetching the registry stored within the controller.
public class ComponentActivity extends Activity
        implements SavedStateRegistryOwner {

    private final SavedStateRegistryController mController =
            SavedStateRegistryController.create(this);

    @Override
    public final SavedStateRegistry getSavedStateRegistry() {
        return mController.getSavedStateRegistry();
    }

}
More interestingly, it calls the save and restore methods on the controller (which, remember, just forwards them straight to the registry) in onCreate and onSaveInstanceState, letting the registry pack the truck with valuables perform its work and save the Bundles of each of its providers:
@Override
protected void onSaveInstanceState(Bundle outState) {
    super.onSaveInstanceState(outState);
    mSavedStateRegistryController.performSave(outState);
}

@Override
protected void onCreate(Bundle savedInstanceState) {
    super.onCreate(savedInstanceState);
    mSavedStateRegistryController.performRestore(savedInstanceState);
}
ViewModels
This is all very interesting, but I’ve promised ViewModels, so where are they in all of this? Worry not, we’re just one step away from them now.
In my previous article, I’ve shown that you need to use SavedStateVMFactory to instantiate your ViewModels to make use of saved state. This isn’t exactly true, as all you really need is a subclass of AbstractSavedStateVMFactory - the former is just a simple, easy to use concrete implementation provided by the AndroidX libraries.
The abstract base class is a KeyedFactory, and takes a SavedStateRegistryOwner as its constructor parameter. It stores the registry the owner contains as a field for later use.
public abstract class AbstractSavedStateVMFactory
        extends ViewModelProvider.KeyedFactory {

    private final SavedStateRegistry mSavedStateRegistry;

    public AbstractSavedStateVMFactory(@NonNull SavedStateRegistryOwner owner) {
        mSavedStateRegistry = owner.getSavedStateRegistry();
    }
}
Being a KeyedFactory, it needs to be able to create ViewModel instances with two different create methods - one that takes just the Class of the ViewModel to create, and one that also takes a key. If it doesn’t receive a key, it will simply use the classname of the ViewModel that is to be created.
@Override
public final <T extends ViewModel> T create(Class<T> modelClass) {
    String canonicalName = modelClass.getCanonicalName();
    return create(canonicalName, modelClass);
}
The star of the show, however, is this next create method which takes the key as well. This method…
picks up its valuables in the morningconsumes any state stored already for thisViewModel, and wraps it in aSavedStateHandle(finally, the class you interact with in client code!),- registers this
handleas a provider so that it may contribute to the nextoutStatethat will be created - I’ll spare you the details of this part, but the handle contains a provider implementation that can provide the contents of the handle as aBundle.
Finally, it creates the ViewModel instance, passing it the already initialized handle that it can use to store and retrieve data.
@Override
public final <T extends ViewModel> T create(
          String key,
          Class<T> modelClass) {
    Bundle restoredState = mSavedStateRegistry.consumeRestoredStateForKey(key);
    SavedStateHandle handle = SavedStateHandle.createHandle(restoredState);

    mSavedStateRegistry.registerSavedStateProvider(
        key, handle.savedStateProvider()
    );

    T viewmodel = create(key, modelClass, handle);
    return viewmodel;
}
As for this last three parameter create method, it’s actually abstract, and is free to be implemented as you wish - but it’s implemented already in SharedStateVMFactory, should you choose to use it (with plenty of reflection, as you’d expect).
@NonNull
protected abstract <T extends ViewModel> T create(
        String key,
        Class<T> modelClass,
        SavedStateHandle handle
);
Let’s recap the most important part of this process, how the state moves from component to component during the lifecycle. Here’s an illustration to guide you (click for full size):
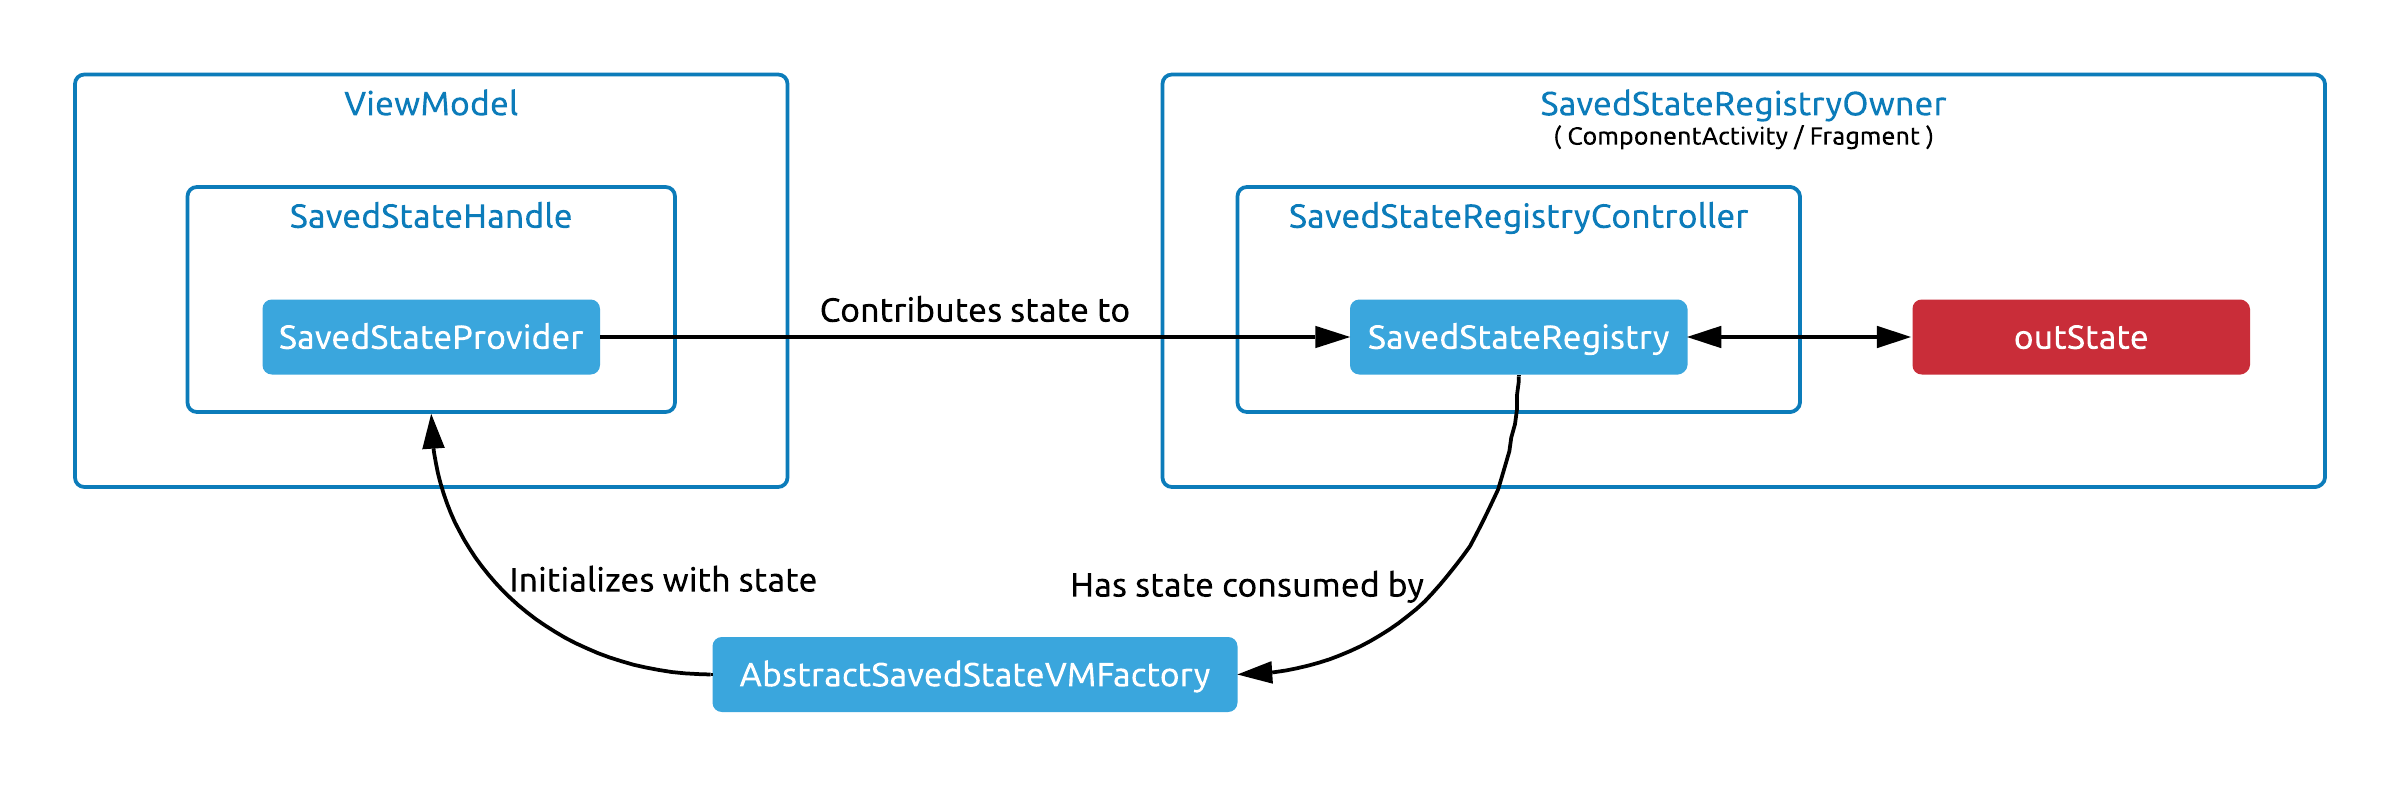
- A
ViewModelis created.- The factory consumes the state from the registry that it can access via the
SavedStateRegistryOwnerthat it received as a parameter. - It wraps this state in a
SavedStateHandle, which contains aSavedStateProvider. It registers this provider with the register. - It creates the
ViewModelinstance, passing in thehandleas its parameter, so that it can manipulate the data stored in it.
- The factory consumes the state from the registry that it can access via the
- The lifecycle aware component has its state saved.
- The controller and consequently the registry is invoked, pulling data from all providers, including the one inside the
handle. - All the collected data as well as any previously restored and not yet consumed data is saved to
outState.
- The controller and consequently the registry is invoked, pulling data from all providers, including the one inside the
- A lifecycle aware component is restored.
- A new registry is created, and is restored from
outState(now calledsavedState).
- A new registry is created, and is restored from
Confession time
So… Where did I slip up, then? Here’s what I said originally:
The only interesting detail I found in the implementation so far is that if you don’t provide a
keyto thegetmethod when you’re asking theViewModelProviderfor aViewModelinstance, your saved data will be associated with the classname of theViewModelinternally (otherwise, thekeyis used). This means that reusing the same type ofViewModelclass for multiple screens will cause their saved states to overwrite each other by default.
The question is, what does actually happen when you don’t provide your own custom key to the ViewModelProvider's get method? It creates a key, prefixed with a constant, containing the classname of the ViewModel you’ve asked for:
public <T extends ViewModel> T get(Class<T> modelClass) {
    String canonicalName = modelClass.getCanonicalName();
    return get(DEFAULT_KEY + ":" + canonicalName, modelClass);
}
Note that this mechanism is different from the KeyedFactory default key substitution we’ve seen above. The non-keyed get method of the factory actually doesn’t ever get called by the ViewModelProvider - it’s only there in case a developer invokes it manually, which you probably shouldn’t do.
With the ViewModel's name being the chosen key, this is what AbstractSavedStateVMFactory will use as the key when accessing the SavedStateRegistry. Having multiple Fragments with the same ViewModel type won’t be an issue, however - as their outState Bundles are completely separate instances!
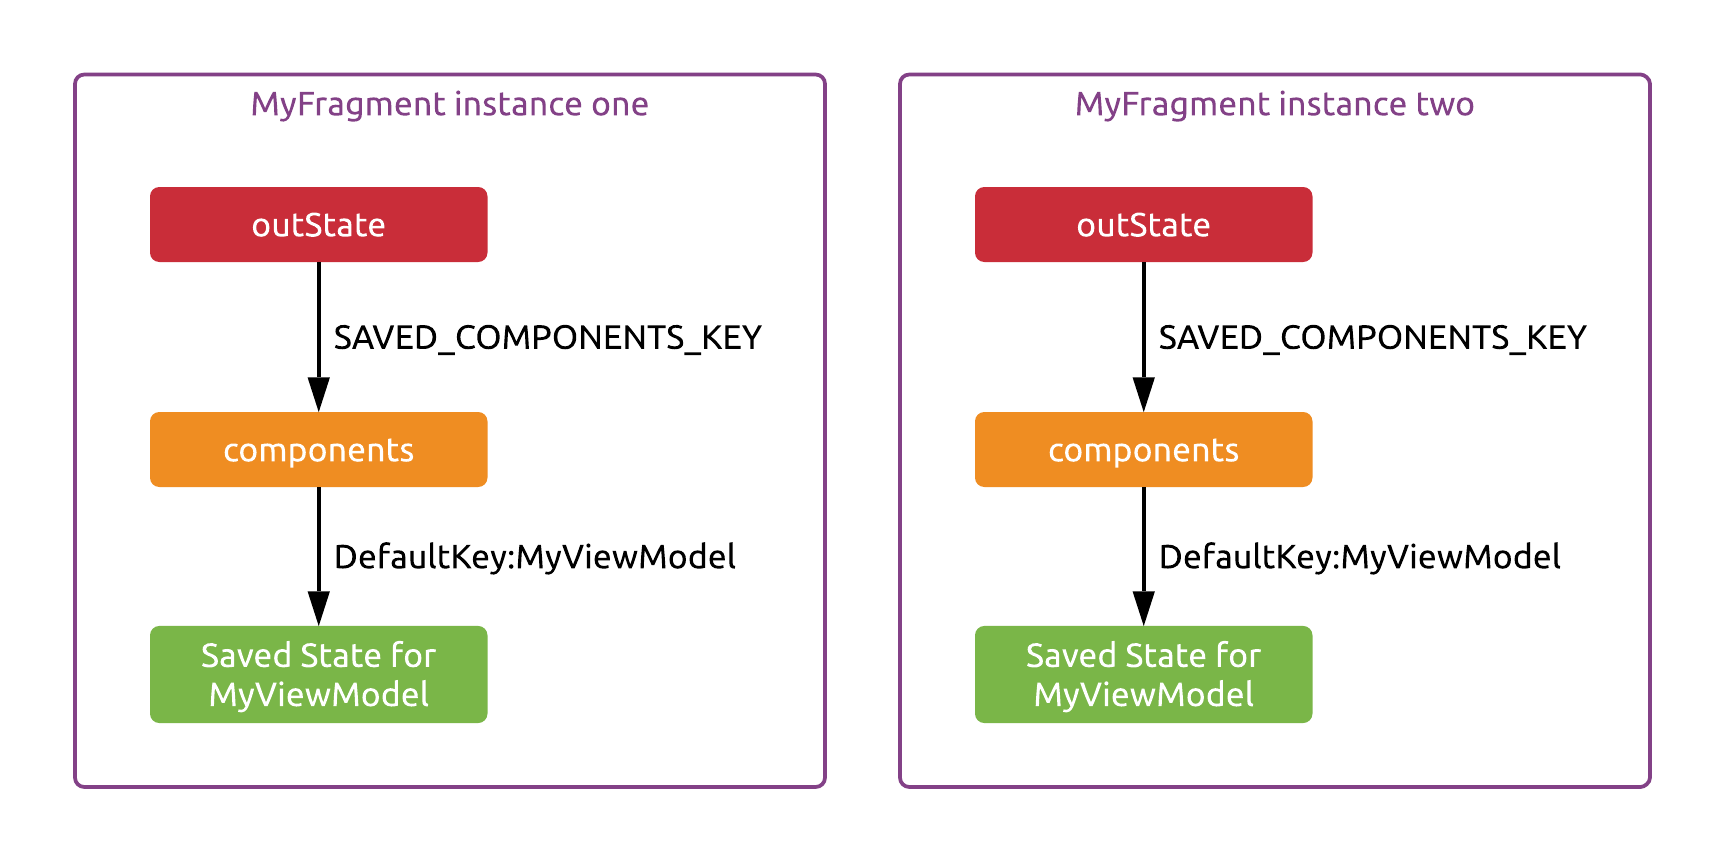
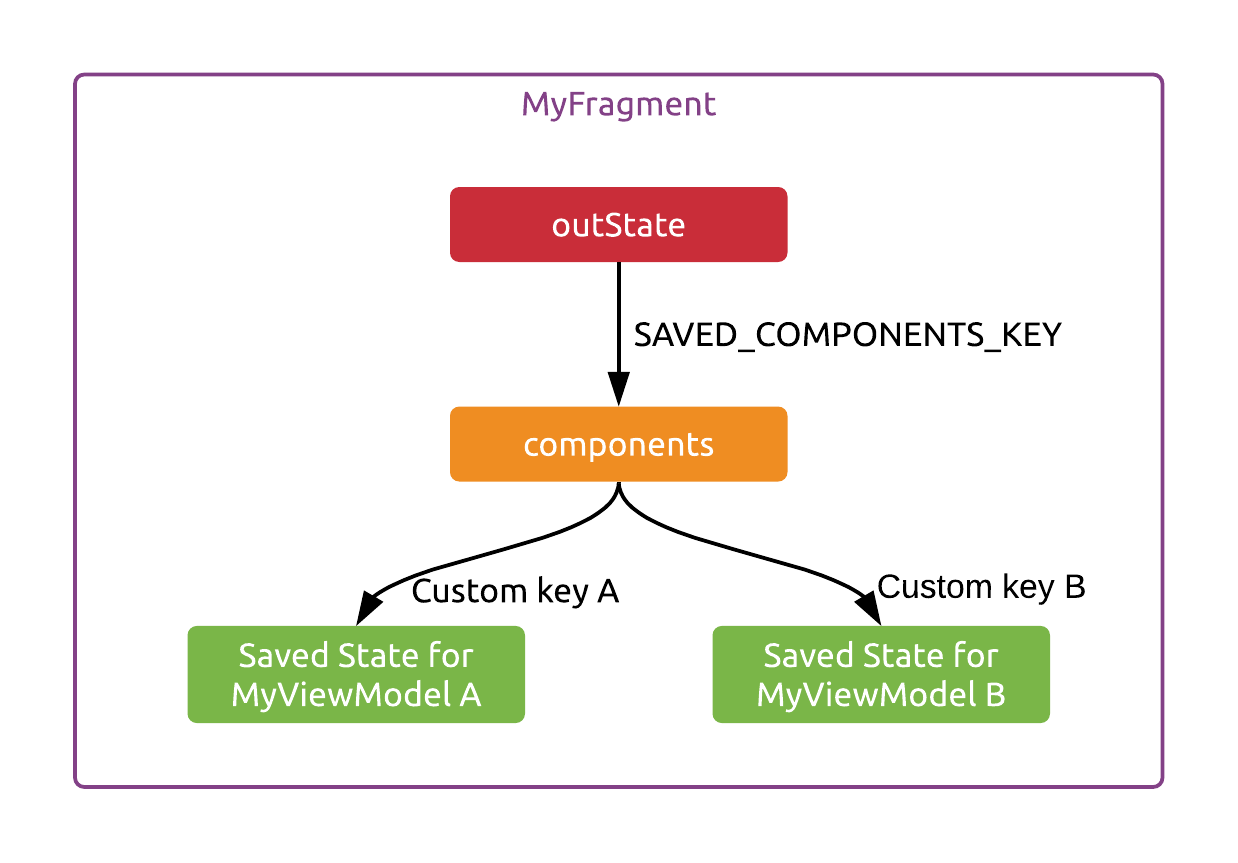
There would only be an issue here if you had two of the same class of ViewModel within a single Fragment - but there’s probably no good reason to do this. And if you do, you can still provide your own custom keys for them to separate their instance state.
Conclusion
That’s it for now! Thank you for reading, I hope you’ve learned something interesting. For even more detail, I encourage you to jump into the source yourself - it’s actually quite easy to navigate after you grasp the overall structure of the many classes involved.
You might also like...
The conflation problem of testing StateFlows
StateFlow behaves as a state holder and a Flow of values at the same time. Due to conflation, a collector of a StateFlow might not receive all values that it holds over time. This article covers what that means for your tests.
Retrofit meets coroutines
Retrofit's coroutine support has been a long time coming, and it's finally coming to completion. Take a look at how you can use it to neatly integrate networking into an application built with coroutines.
An Early Look at ViewModel SavedState
A quick preview of the new SavedState support for Android Architecture Component ViewModels.
Setting up Compose Multiplatform previews
Compose Multiplatform now has support for previews in common code. Here's how you can get started with using them.