The Single-cable Dream
2020-05-10 • Márton Braun
As much of the world, I also started working from home recently, and I expect to be doing so for a while. I took this as an opportunity to splurge a bit, and perform a massive upgrade of my desk setup. I had a cozy setup already, usually used for gaming, media consumption, and side projects. Dual screens, surround speakers, a bunch of input devices, and so on. All of these were hooked up directly to my desktop PC.
However, in addition to that machine, I also own a laptop I use occasionally (a used XPS 13 from 2018), and now I also have my work laptop (a 15” MacBook Pro) here at home all the time.
I could hook up my laptops to the displays by digging up some extra HDMI cables, and I could switch my mouse and keyboard to a laptop thanks to them supporting multiple paired computers, but swapping these things was a process - one that I’d have to do at least twice a day. This was tedious, and only allowed me to hook up a part of my setup to the laptops. For example, they wouldn’t be able to make user of the external speakers or the wired internet connection. The latter turns out to be especially important, as the MacBook didn’t do a great job of handling Zoom calls over wifi.
While I was having this trouble with my desk here at home, I’ve been using Thunderbolt docks at work for years, both on Windows and macOS. Every peripheral for my laptop as well as charging could be hooked up with a single cable, allowing me to unplug the machine in a second when I had to go to a meeting. So I knew that this kind of thing was possible to do on both platforms. Separately. On laptops.
So then, with that in mind, I had the objective for my project. Make the entire desk setup - and I mean all of it - easily swappable on a single cable to any of these machines.
In other words, let any Thunderbolt 3 capable device be docked to the desk.
After all, there is no software problem that we can’t solve by introducing a new level of abstraction or two. I just had to apply the same idea to hardware.
Table of Contents
- Existing parts
- Picking parts
- Initial setup
- Picking more parts
- Fixed setup
- Known issues
- Observations and random thoughts
- Tips
- Final evaluation
- What’s next?
Existing parts
First, here are the machines I’d be using in the setup, for now:
- Dell XPS 13 9370
- MacBook Pro 15” (2019)
- Desktop PC
These cover both Windows and macOS, as well as laptop and desktop, so if the setup works with all of these, I expect it to work with anything with a Thunderbolt 3 port that lands on my desk.
As for the peripherals that should be hooked up to these:
- LG 22MP55 display (1920x1080 @ 60Hz)
- LG 29UM58-P display (2560x1080 @ 60 Hz)
- Logitech X-530 5.1 PC speakers
- Logitech G35 USB headset
- MX Keys
- MX Master 3
- Wired gigabit Ethernet connection
- Various other USB devices
Picking parts
With all that laid out, I started browsing for parts. The primary concerns when making decisions here were the following:
- Cross-platform support: I didn’t trust anything that didn’t advertise Mac support explicitly to properly support a Mac. I find Windows support to be pretty much universal for peripherals, but I’ve had trouble before with devices that a Mac could not handle for whatever reason (e.g. macOS was having none of the Dell TB16 Thunderbolt dock I used to use with an XPS 15 at work).
- Reliability and trustworthiness: I knew that I’ll be able to plug everything together physically, but I was unsure whether all signals would really get where they had to. I was prepared to do a lot of debugging, and I did not want a cheap part failing somewhere in the chain to cause issues, if I could possibly avoid it.
I also hoped to avoid having to take multiple trips to the store or return things via delivery services as much as I could.
The dock
The centerpiece of the setup was going to be a Thunderbolt 3 dock. These come in various shapes and sizes. I had the following hard requirements for the dock:
- 3+ USB-A ports: Logitech wireless dongle, headset, gaming keyboard and mouse, phones for debugging, etc. More can always be added with a hub, but a dock should have a healthy amount to start with.
- 2 display outputs, which support resolutions above 1080p (which is the case for one of my displays already).
- Gigabit Ethernet.
- A detachable cable going to the host machine. Some docking solutions are more like dongles, as they have one end of the Thunderbolt cable (semi-)permanently sealed within them. This means that it couldn’t be swapped out for a longer cable, which I needed for the connection to my desktop.
- Power delivery to the Thunderbolt host machine, to charge a connected laptop.
I had previous experience with two specific dock models. The first of these was the Dell TB16, which was out of the question due to the lack of Mac support - the lack of support for it in macOS, that is.
The other is the wonderfully named Startech TB3DOCK2DPPU (alternatively, the Startech Dual 4K 60Hz Monitor Thunderbolt 3 Dock with 6x USB 3.0 Ports, which doesn’t sound much better). This is a dock that works well with both PCs and Macs, and has a decent selection of ports compared to many of its competitors. However, it’s a bit pricy at ~400€, and it’s rather large physically.
Since the Startech dock was almost what I was looking for and I already trusted the company to ship working products, I browsed around their other offers for a while, but I didn’t quite find a good fit for my setup. If you find something from Startech that fits into yours though, you probably can’t go wrong with them.
Another alternative that I kept bumping into in local stores was i-tec, a Czech manufacturer, whose products were decent in terms of ports and claimed to have Mac compatibility. However, they were also physically large, somewhat cheap looking, and it’s difficult to find proper reviews of them, as they’re not a very well-known company.
I eventually stumbled upon the Caldigit TS3 Plus. This dock was compact, industrial looking (for consumer hardware), and seemed to have as many ports as any other, and then some. It was also from a well-known brand, with plenty of reviews. Wirecutter, Macworld, and 9to5Mac all gave it rave reviews and recommendations, as well as indie creators on YouTube. Someone even made a super useful teardown of its internals, which explained what exactly it can be expected to handle.
I found it in stock for ~250€, at the Apple Store, out of all places. This meant quick and reliable free shipping, and also gave me confidence that this product would indeed work with a Mac as advertised.

Thunderbolt 3
It’s worth getting familiar with what Thunderbolt 3 is, since that’s what powers the essential parts of the setup, and understanding how it works will prevent issues such as purchasing incompatible devices. It should also set the correct expectations of what signals it will be able to carry exactly. Unfortunately, it’s not a trivial standard.
First of all, it uses USB-C as its physical connector. This connector on its own doesn’t mean that a device is Thunderbolt 3 capable - far from it - so make sure you check what your device supports. Note that this may even differ for each of its individual USB-C ports, depending on how they’re wired internally.
Thunderbolt 3 wraps up the following things into a single cable:
- DisplayPort 1.2 display streams, up to 4K@120Hz, or 2x 4K@60Hz, or 6K@60Hz.
- PCIe 3.0 lanes (x4), which is a high-speed direct connection to the CPU, usually accessed through PCIe slots on a desktop motherboard. This PCIe connection can provide USB ports, a network connection, and much more: this is what backs all the non-display ports on a Thunderbolt dock.
- USB Power Delivery, up to 100W. This can power a laptop from a dock if the connected host device supports the standard, and the dock is powered appropriately. It can also be used to power a device such as a monitor from a dock.
The total bandwidth used by the data streams mentioned above is up to 40 Gbps with Thunderbolt 3. When checking your device’s support, or buying cables, always pay attention to the bandwidth listed. Some Thunderbolt 3 devices and cables only support half of the max bandwidth, 20 Gbps. This is the speed that Thunderbolt 2 used to run at. If anything in the chain (host, cable, device) doesn’t support the full bandwidth, the connection will run at half speed. This, for example, would prevent you from running two 4K displays on a single connection.
Take a look at this post for a good overview of the bandwidth that a given display configuration would require.
Carrying 40 Gbps speeds over a cable is not an easy endeavour, so you might notice that many Thunderbolt 3 cables happen to be about 50 cms long. This is the roughly the maximum possible length for a passive Thunderbolt 3 cable.
If you’re buying a Thunderbolt 3 cable longer than 50 cms, make sure that it’s an active cable. Passive cables that are 2-3 meters in length will only be able to carry 20 Gbps of bandwidth. Active cables, on the other hand, are more expensive, as they contain additional electronics to boost the signal.
Thunderbolt on a desktop
So the dock would sit on my desk, and it would have to be hooked up to the desktop (sitting under the desk) with a relatively long Thunderbolt 3 cable. This would have to be an active cable due to the length - I picked up a Belkin 2m 40 Gbps cable, again from the Apple Store, for about ~80€.
For comparison: a passive cable of this length, which would run at 20 Gbps, can be found for ~35€. If a cable doesn’t state what speed it supports, the price can be a good hint.
How can this be hooked this into a desktop computer then?
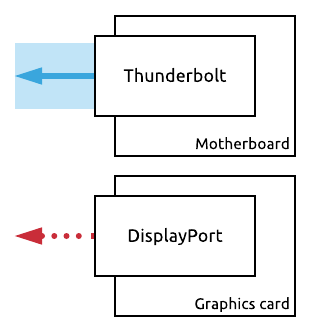
With a built-in port
If one has a very high-end motherboard, it might just have a Thunderbolt 3 port on it. In this case, the Thunderbolt 3 cable can be plugged into that port, the other end into a dock, and that’s it. Well… Almost it. The PCIe connection would work.
However, if displays are connected to the dock with this configuration, they would have to be powered by the CPU’s graphics. If there is a dedicated graphics card in the PC, the output of that card won’t be routed back into the motherboard after it rendered it, and out the Thunderbolt port. A graphics card always outputs through its own display out ports.
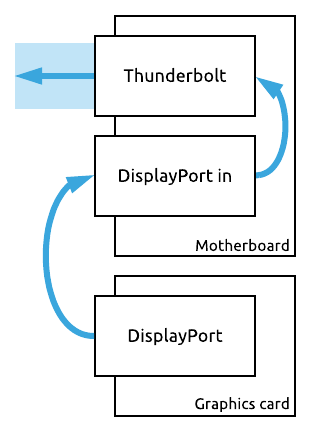
Instead, motherboards that have a Thunderbolt 3 port tend to also include a DisplayPort input port, and they’ll feed the signal received there into the Thunderbolt connection. To make use of this, a short DisplayPort cable would have to be looped from the back of the graphics card into the motherboard, outside of the case.
Adding a port (or two)
If a motherboard doesn’t have a built-in Thunderbolt port, as it was the case for me, one can still be added to the machine. Thunderbolt is a combination of PCIe and DisplayPort, so a PCIe add-on card can provide Thunderbolt ports.
There are relatively few products on the market of this kind, mostly by manufacturers who are in the motherboard and add-in card business to begin with, such as Gigabyte, ASRock, or ASUS. The Gigabyte GC-TITAN RIDGE card is one of the most well-reviewed ones, and it also had clear support for the Gigabyte motherboard that I have.
It has dual 4K capable DisplayPort input ports (same idea as above, to hook a graphics card’s outputs into), which it feeds into the Thunderbolt connection. It also happens to have two Thunderbolt 3 ports, though I’ll only need one of them to connect to the dock.
It could also supply 100W of power through Thunderbolt, for example to a Thunderbolt display that doesn’t have external power. This, again, won’t be used in my setup, as the dock has its own power source, and so do the displays. Only data and display streams will be carried between the desktop and the dock.
I found that this product wasn’t really available anywhere in my country, save for one small store who luckily had a single one in stock, for ~75€. Score.
Display adapter
The CalDigit dock has two ports where it can output display signals: a Thunderbolt output port, and a DisplayPort port. However, both of my current displays accept HDMI inputs. Therefore, I gave i-tec a chance after all, and ordered one of their USB-C to dual 4K HDMI adapters. The plan was for this to be plugged into a dock, and that it will convert the two DisplayPort streams present in the Thunderbolt connection into two HDMI signals. I found this item for ~35€.
Initial setup
With that, I was done with the first iteration of my setup, which supposed to work something like this:
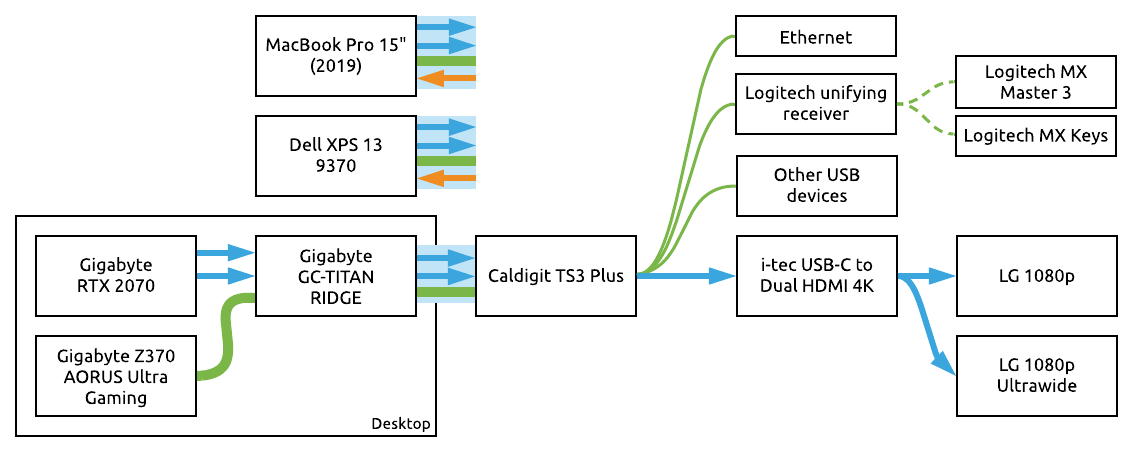
After hooking up all of this, to my surprise, most things on most machines worked immediately.
The GC-TITAN RIDGE card, inexplicably, came with a driver CD. Since I haven’t had a way of reading a disk in years, I ended up downloading the drivers instead. Thankfully, they were easy to find.

I also performed a BIOS update to get support for the Thunderbolt 3 PCIe card - apparently I was running a BIOS from 2017. Oops. With that installed, my PC picked up the dock being available as a Thunderbolt 3 device, and asked me whether I want to connect to it.
On the laptops, I had no updates or installs to do. Both of them picked up the Thunderbolt connection immediately.
As for what was broken…
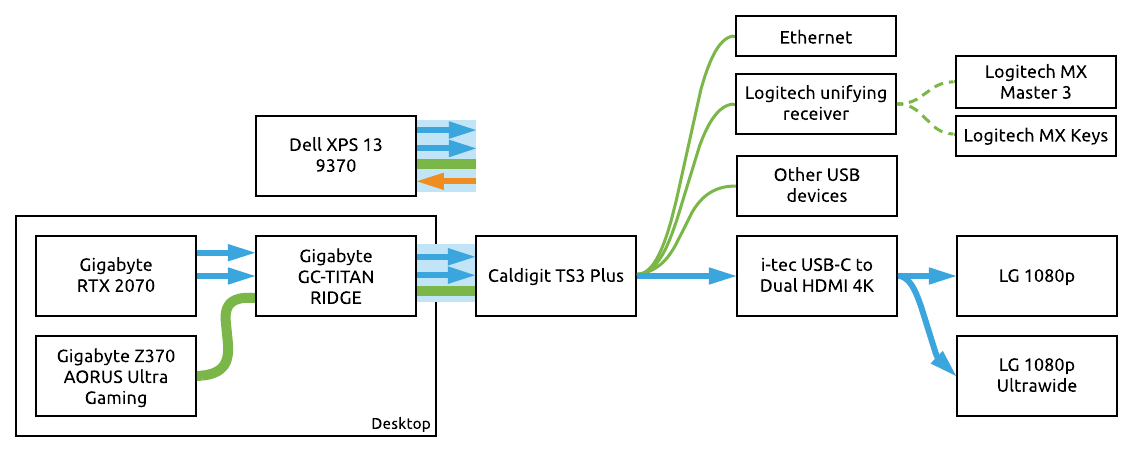
It turns out that if you’re converting USB-C into dual HDMI, Windows will support two different display outputs over those HDMI ports. So the setup worked like this on PCs:
However, on macOS, you can only get a mirrored signal out of those two HDMI ports, and can’t use them in extended mode.
This was my oversight - this was clearly stated on the product page of the adapter I bought, I just missed it. It’s also worth noting that while I was plugging this adapter into the Thunderbolt out port of the dock, this is actually just a USB-C adapter. Having a Thunderbolt 3 to HDMI x2 adapter would, in theory, work fine on macOS as well.
As a temporary fix, I could get a second display output out of the MacBook Pro via a Dell DA-100 USB-C dongle that I had on hand.
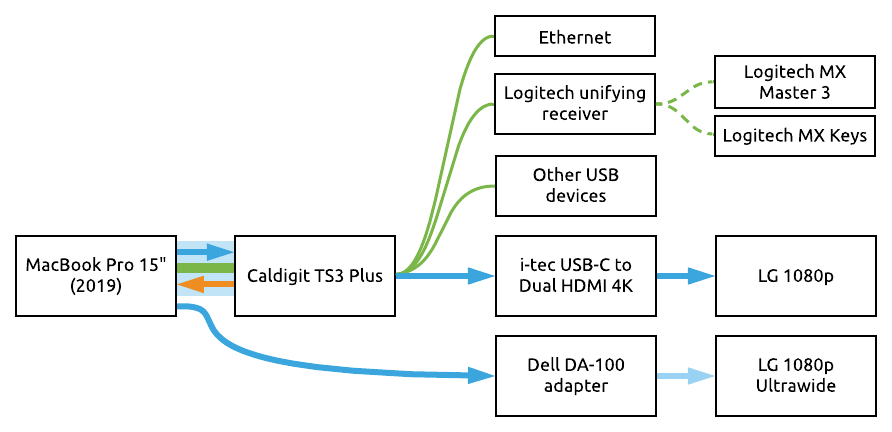
This worked, but it wasn’t perfect. It wouldn’t work through the dock, so I had to connect it directly to the MacBook, and it could only output a 1080p signal, meaning I had to work with some black bars on my ultrawide monitor for a while.
Picking more parts
Having failed to connect my second display properly, it was time for another shopping round. I was also pleased with how the setup was going so far, and decided to also route my surround speakers through it.
DisplayPort adapter
The required display adapter was easy to find: the one I got is by another Czech manufacturer, AXAGON, their RVD-HI2. It’s an active DisplayPort to HDMI 2.0 adapter, and it supports up to 4K@60Hz. It was available for ~15€.
It’s important for this to be an active adapter. I had a passive DisplayPort to HDMI cable on hand, but plugging that into the dock and my monitor didn’t work. This is because Thunderbolt always carries display signals in the DisplayPort format, and there is a conversion step needed if you want to run an HDMI display from it.
Surround sound output
As for the sound, my now ancient - but still surprisingly decent - Logitech X-530 speakers connect to a PC with three 3.5mm stereo jack plugs, for the front, rear, and center/sub channels. While nearly any PC motherboard these days has a 6-jack audio panel that this fits into trivially, external devices with such outputs aren’t that easy to find.
The product I ended up with is the Creative Sound Blaster X3, a compact USB DAC that has a 4-jack 7.1 output configuration on the back that my speakers can be plugged into directly (skipping the one for the side speakers that I don’t have), as well as two different jack inputs, and a headphone output on the front.
It also has a convenient volume wheel, and a couple buttons that change EQ modes, switch between inputs, and let you control the mic input. The headphone AMP can drive headphones up to 600Ω, a feature I’ll likely never make use of.
This product is an overkill for my needs in some regards, but it was well-reviewed, fairly mainstream (lots of coverage is always good), and has great software support for all of its features for both platforms. I found this locally at the price of ~130€.
Two alternatives deserve mentions in the audio category.
The Asus Xonar U7 MKII is a very similar product to the X3, though significantly cheaper, coming in at ~80€. It has roughly the same capabilities in terms of in/outputs, and a similar volume wheel. One downside for me would’ve been that it outputs the two front channels on separate RCA plugs, which I would’ve had to convert into a single stereo jack. In theory, it supports macOS, though I didn’t find much evidence of this, and reviews of its software for Windows weren’t outstanding either.
On the other end of the spectrum, the complete overkill choice would’ve been the Creative Sound Blaster X7. On top of what the X3 provides, it has a built-in mic, support for even more outputs, and for more serious bookshelf or tower speakers. It also has Bluetooth connectivity, which would’ve been really handy for me, as the Bluetooth connection for my headphones would’ve swapped across my machines automatically too. It also uses separate RCA outputs for the front speaker channels which would’ve required an adapter for my setup, but due to the price of this product - roughly 350€ - it was never a serious consideration.
Fixed setup
With these two last pieces acquired, my setup was finally complete. with everything routed through the dock:
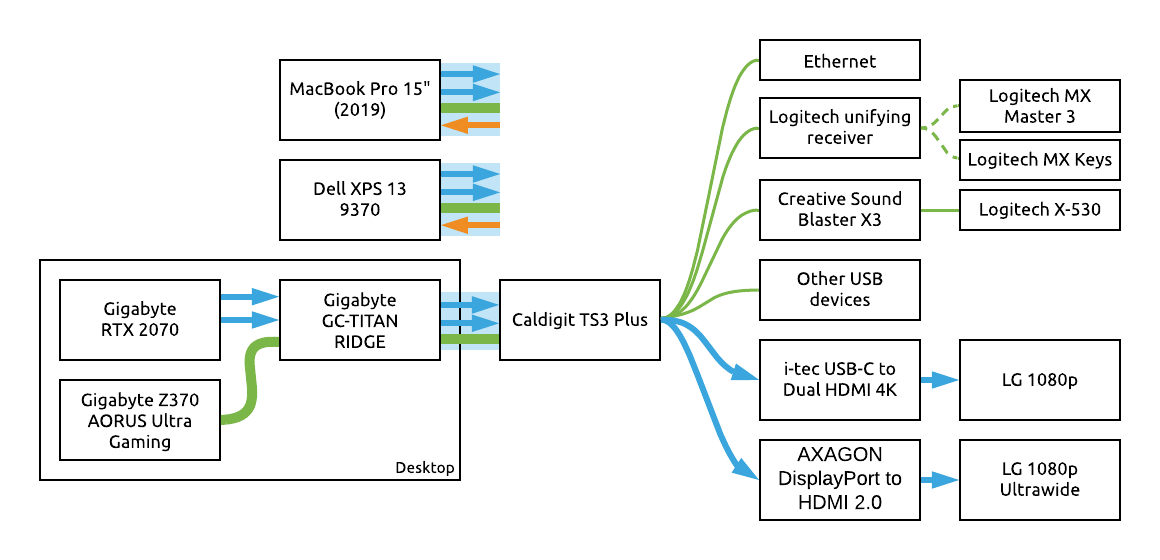
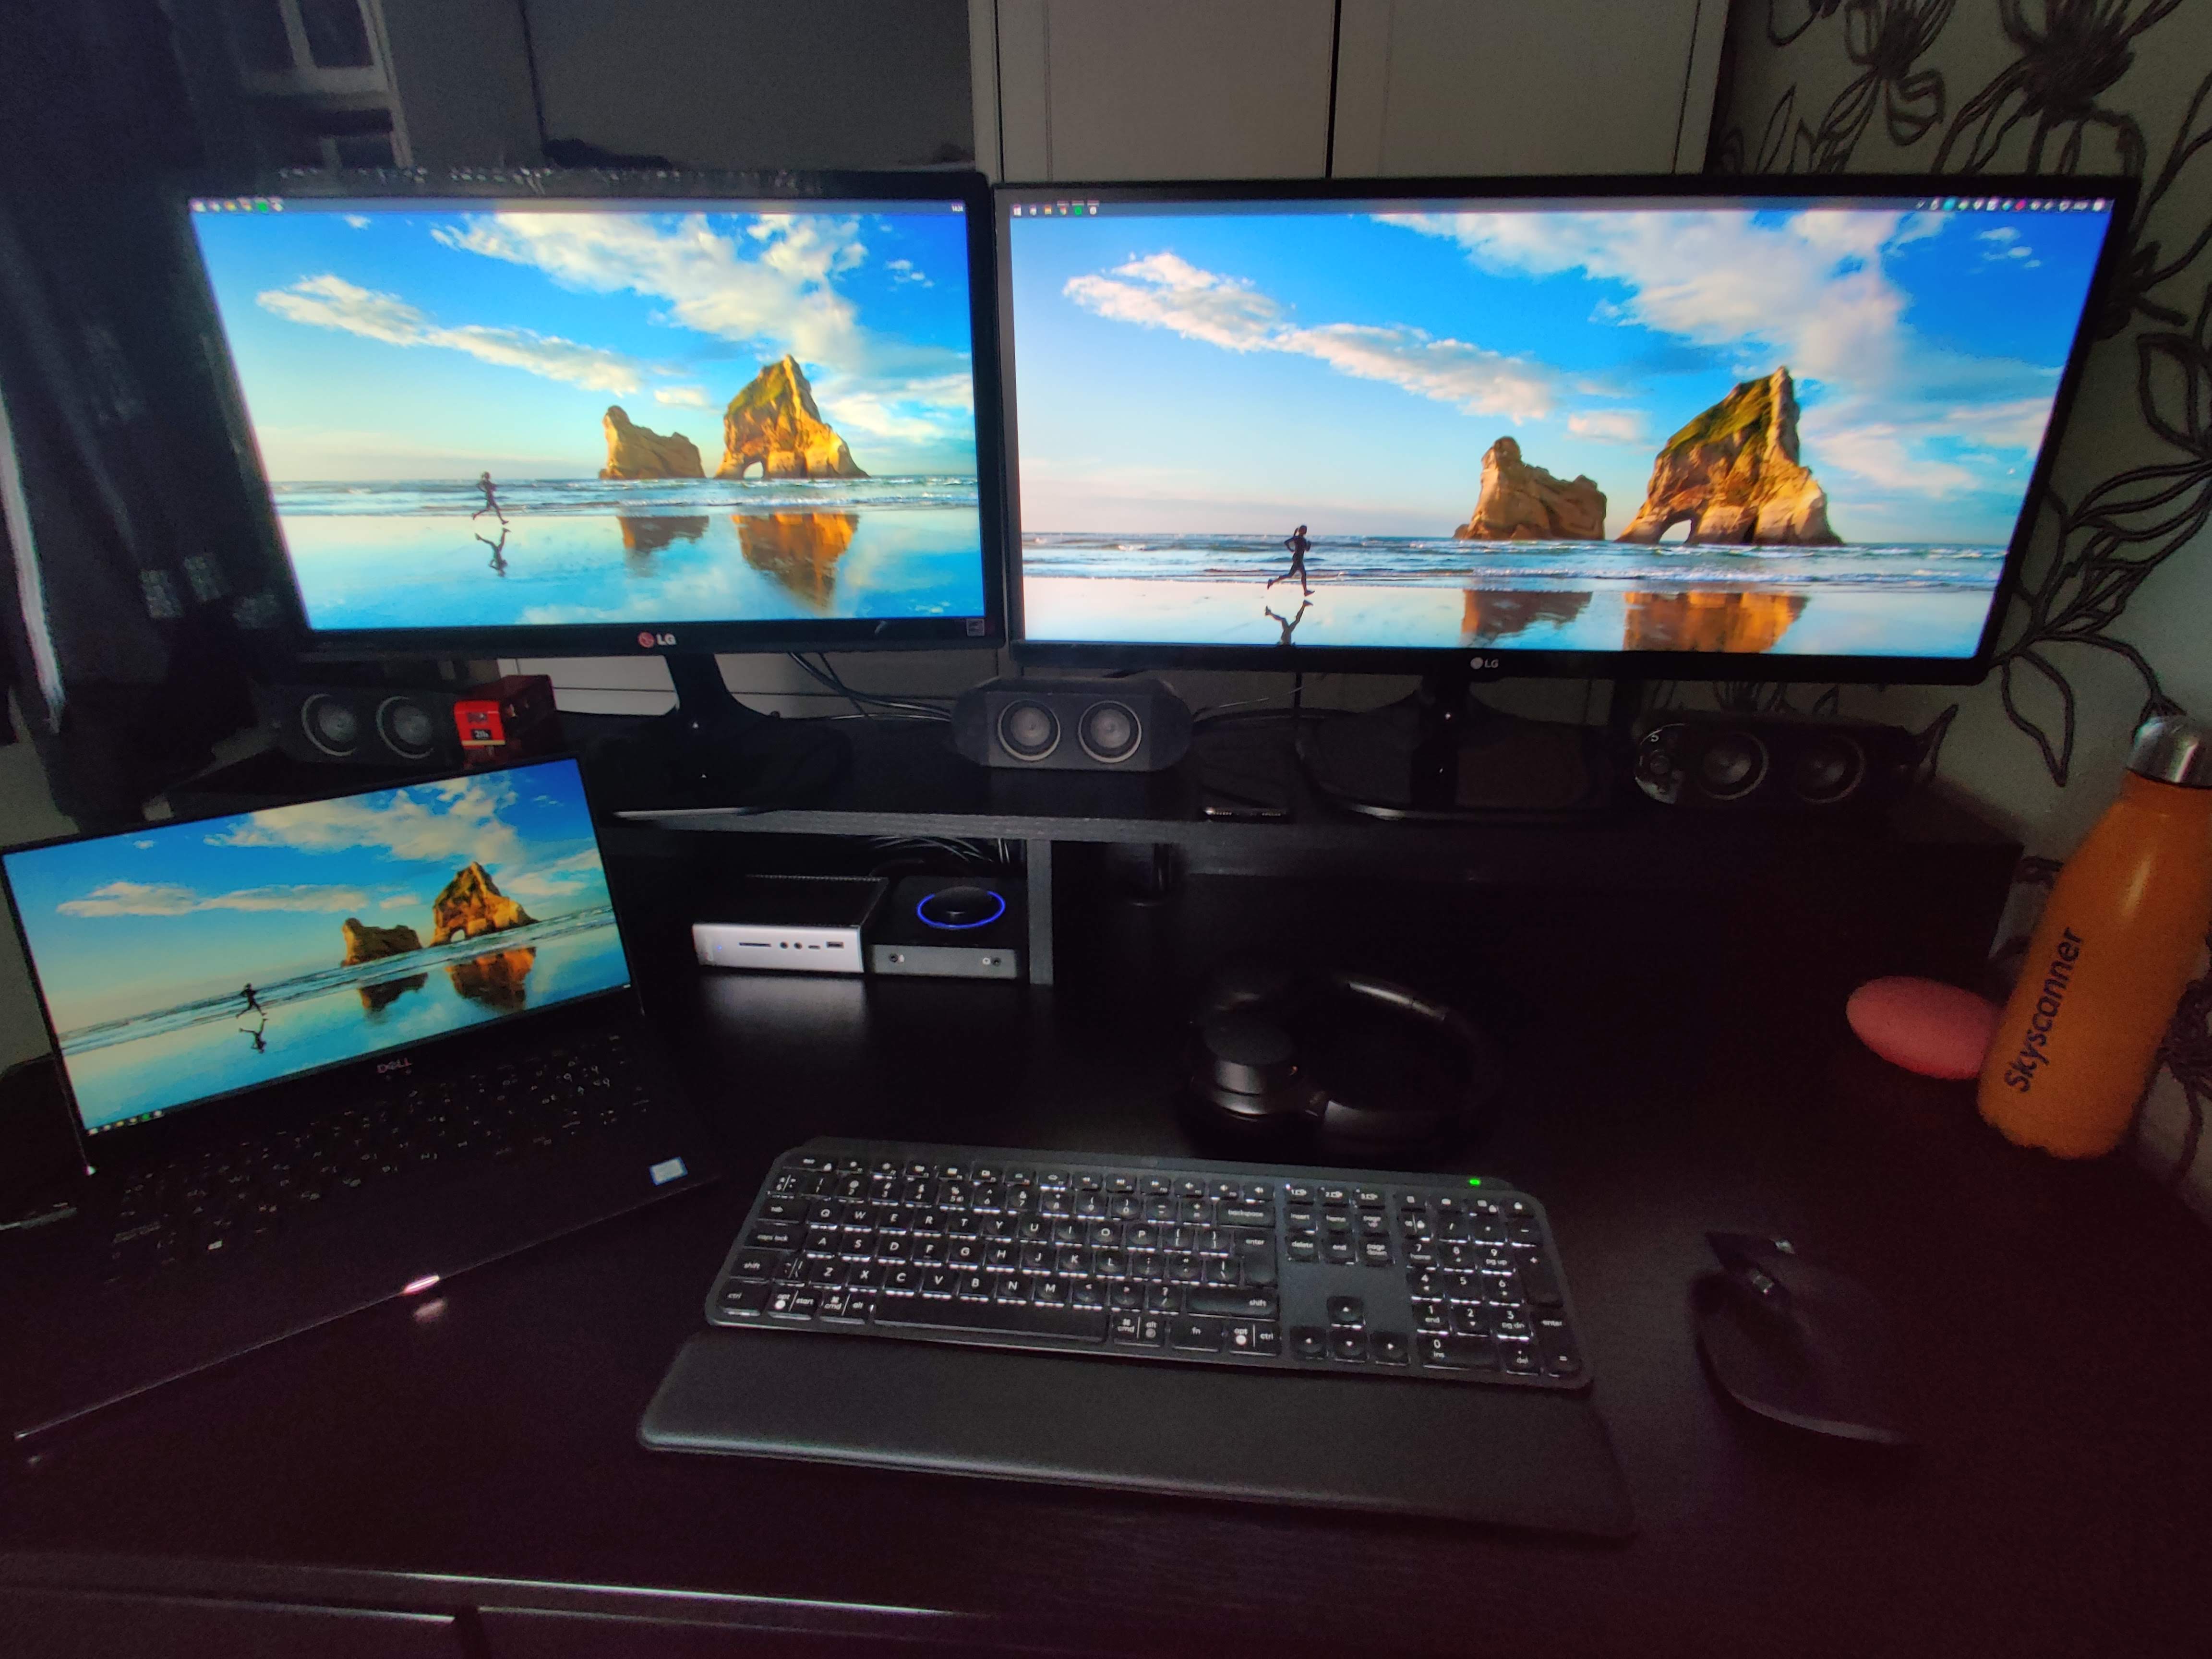
The laptops could be connected with the short Thunderbolt 3 cable that came with the dock, and swapped in seconds:

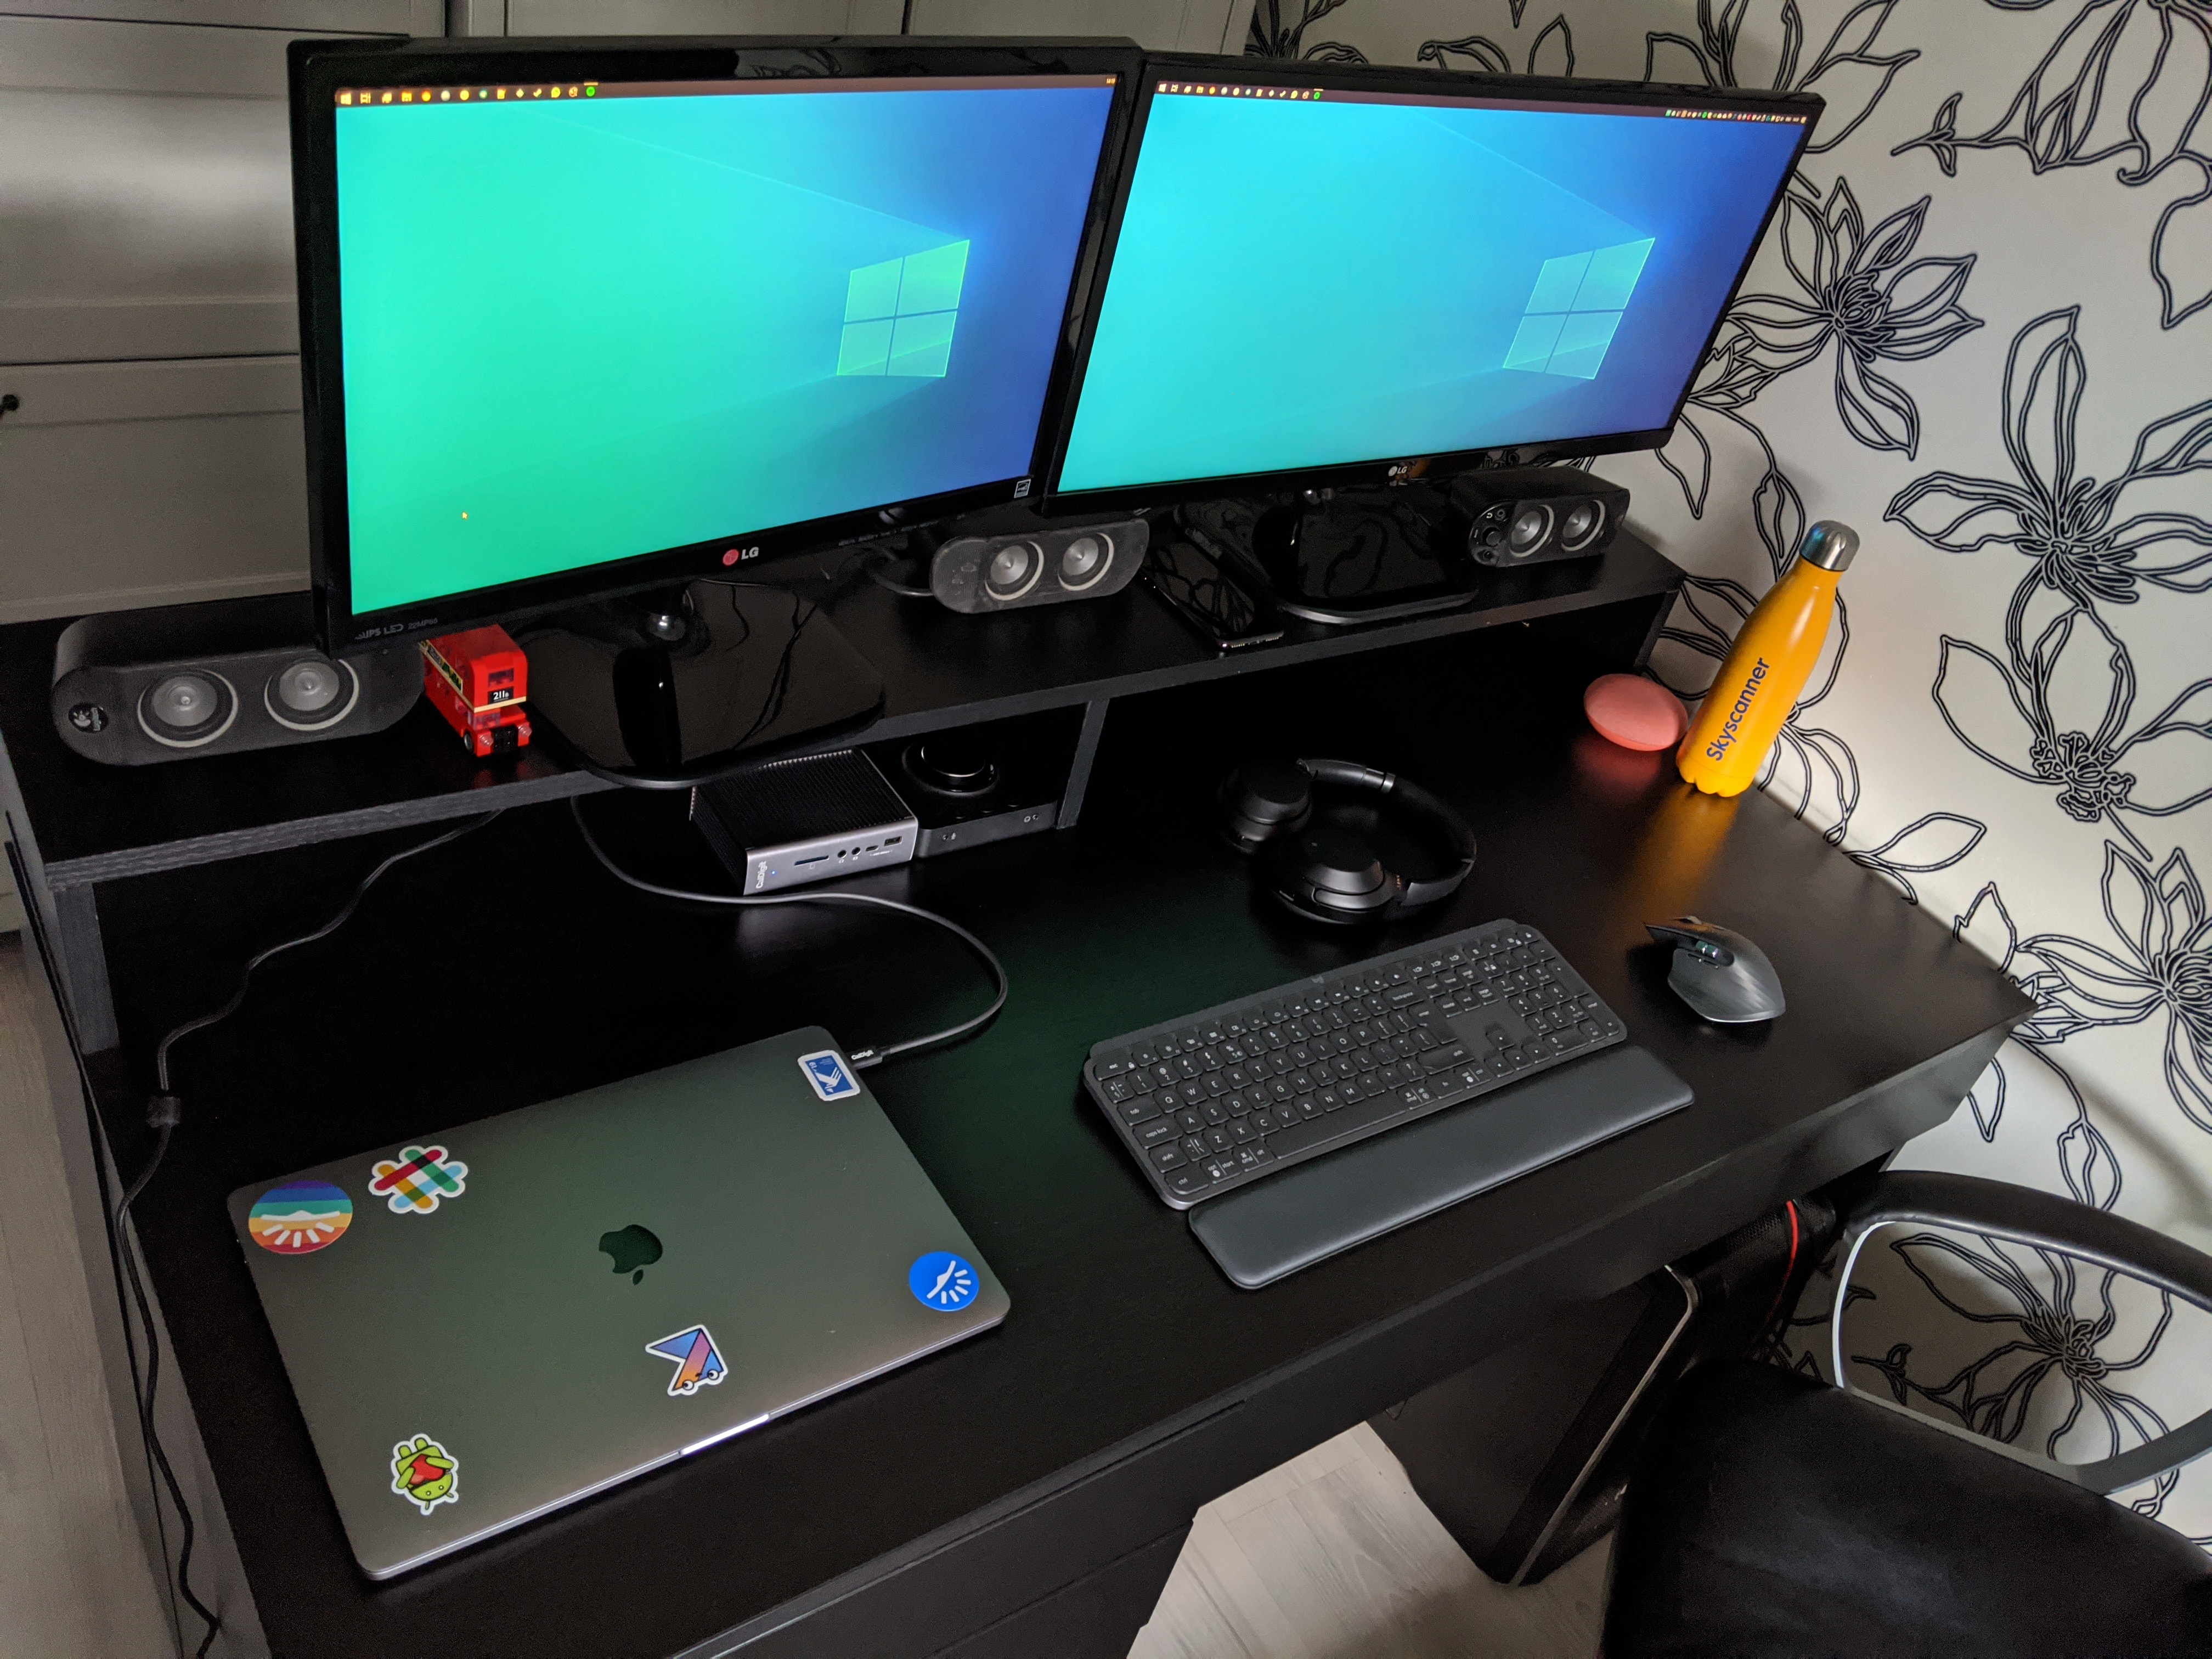
The desktop has its own cable routed to the dock, so to connect that machine, the input cable at the back of the dock has to be swapped - a bit more inconvenient, but still a matter of seconds:
Known issues
Is this setup completely seamless? Well, no… But it’s really, really freakin’ close. And way smoother than I ever expected it to be.
For one, there is the inconvenience of manually switching the short Thunderbolt cable used with the laptops to the long one routed to the desktop. The host cable is plugged into the back of the dock, so I have to do this swap without seeing what I’m doing. This is only a few seconds and I’ve developed muscle memory for where to plug the cable in.
Still, it would be nicer if there was a Thunderbolt switch of some sorts that would provide this at the press of a button, so that there’s less stress on the connectors. As far as I can tell, this kind of device doesn’t exist.
I found out that not all the USB ports on the back of the dock are created equal. This didn’t matter for most USB devices, however, plugging my USB headset into some of the ports would result in a very low max volume, while others delivered the volume level I was used to.
Again, this teardown video reminded me that not all the USB ports were powered the same way internally, so it was worth trying different ports. For me, the two innermost ports were the best to use with the headset.
Lastly, I had some weird, occasional issues, which so far only showed up when the dock is connected to the desktop:
- The display that’s connected through the USB-C to HDMI adapter sometimes doesn’t get a signal after booting up, and the HDMI cable needs to be unplugged and plugged back into the monitor to reset this.
- I’ve seen the Creative Sound Blaster X3 not getting powered by the dock a couple times. Unplugging its USB cable and plugging it back in solved the issue.
Observations and random thoughts
I found that the external metal surface of the CalDigit dock gets quite hot when used, to the point where holding your hand on it would be unpleasant. Since it’s only passively cooled and very compact, this seems like normal operation. It happens whether it’s running off a desktop or a laptop, but when it’s powering a laptop, it seems to run especially hot - though I didn’t have a way to measure this.
Thunderbolt devices - including the docks - have a Thunderbolt passthrough port on them, to daisy chain additional devices. One common way to make use of this is to connect a Thunderbolt-compatible display, which can also receive its power from this connection.
However, you can even chain multiple docks, which is an interesting way to get even more connectivity. Keep in mind that while this will increase the number of available ports, the 40 Gbps total bandwidth still applies, as well as the limitations on what display streams the connection can carry. One thing I found interesting is that it’s possible to connect displays to different docks, and they’ll each grab one of the display signals coming from the host device.
Having a desktop PC that has just two cables connected to it - power and Thunderbolt out - instead of a dozen different ones has a super useful perk that I didn’t consider beforehand: when it comes to cleaning it, taking it out from below the desk is a lot more convenient than before.

Tips
If you’re planning to put together something like this, here are some things to keep in mind, based on my experience:
- Check whether your dock has a detachable cable. If you need a cable longer than 50 cm then this is a hard requirement, but it’s also a nice plus otherwise, as it offers flexibility for the future.
- Pay attention to cable speeds, make sure you get active cables if you want to avoid your bandwidth being cut in half.
- If you’re using a laptop in a setup like this, look into what port it has exactly, and what it supports being output through that port.
- In you’re using a desktop, be very sure that all your components will support Thunderbolt operation, because this is a rare use case for desktop PCs, and especially your motherboard might not fully support it.
- If you’re planning to run multiple operating systems, keep compatibility in mind for every device you include in the setup. Whether a device has software support on a platform is especially important, as without the right software, lot of modern peripherals will be crippled. Picking mainstream products is an easy way to ensure this.
- Double-check if peripherals you’re buying use Thunderbolt 3 specifically, or if they’re really just USB-C. Sometimes the latter is advertised as “Thunderbolt 3 compatible”, which is technically true for everything USB-C.
Final evaluation
I started this process on a whim after I realized I’d have to use multiple machines at home, for quite a while. I was hopeful getting into it, but I was also completely prepared to find out that the setup is just fundamentally broken in a way I didn’t anticipate, and I’ll have to return everything I ordered.
I was very pleasantly surprised to find that almost everything that I could physically connect worked together immediately. I did have some oversights, as I anticipated, due to simply not being familiar enough with Thunderbolt 3 and how it works - mostly around how display signals were carried over the connection and had to be converted. The issues I had didn’t cause a whole lot of headache though, and they all turned out to be fairly easy to fix.
At the time of publishing this article, the whole setup has been in use for about 2 months, and I could not be more satisfied. It has one or two small quirks, but the convenience it provides, and how stable it is overall is amazing. We shouldn’t call technology magical, but this is the closest thing I’ve seen to something worthy of that phrase.
It has to be mentioned that Thunderbolt is… Really expensive. If you don’t actually need this kind of convenience, getting into this ecosystem isn’t exactly a good investment. A single cable can cost the kind of money that other people might buy a smartphone for. If you want devices in your setup that Macs are willing to work with, that will also bear extra costs - though if you have one, you’re probably already used to that.
Running through Thunderbolt also introduces complexity when compared to directly connecting things to a desktop PC. For example, if I wanted to hook up more than 2 displays, I’m not sure how Thunderbolt would handle it, but I could trivially do it by connecting them to my GPU.
What’s next?
As far as I’m concerned, calling this setup convenient would be an understatement. This lengthy writeup attests to how satisfied I am with it.
Finally, am I really done with this setup? Probably not, something can always be upgraded… Displays and audio devices are what I have my eyes on next.
You might also like...
Designing and Working with Single View States on Android
Describing the state of a screen is a common practice these days thanks to MVI popularizing the concept. Let's take a look at some examples of how you can design your state objects neatly using data classes and sealed classes, and how you can put them into practice.