@JvmOverloads for Android Views
2019-02-22 • Márton Braun
The @JvmOverloads annotation is a convenience feature in Kotlin for interoperating with Java code, but there is one specific use case on Android where it shouldn’t be used carelessly.
Let’s first look at what this annotation does, and then get to the specific issue.
Kotlin’s function call conveniences
Kotlin supports default parameter values, which lets you define functions such as this one (not that I’d recommend these specific defaults for a real application):
fun register(
    username: String = "user",
    password: String = "hunter2",
    email: String = "[email protected]"
)
Client code written in Kotlin can call this function in several different ways. You may…
// provide all parameters explicitly, either positionally, or with named arguments
register("jim", "jimmy", "[email protected]")
register(username = "jim", password = "jimmy", email = "[email protected]")

// omit all of them and rely solely on the default values
register()

// specify any number of parameters (in any order!) using named arguments
register(email = "[email protected]")
register(email = "[email protected]", password = "1234567")
Since Java supports neither named arguments nor default values, all of these different ways of invoking this method won’t be available for Java clients. They can only call this method with all arguments explicitly provided, positionally:
register("jim", "12345", "[email protected]");
Annotations to the rescue
This is what @JvmOverloads aims to improve: it generates additional overloads for the method to be used by Java clients.
@JvmOverloads
fun register(
        username: String = "user",
        password: String = "hunter2",
        email: String = "[email protected]"
)
Now Java code may provide 0 until n arguments for the method, but still has to pass in these arguments positionally:
register();
register("jim");
register("jim", "12345");
register("jim", "12345", "[email protected]");
This means that whatever parameters you want to make use of default values for the most when calling from Java should be the very last ones in your parameter list.
How it works
Whenever a function with @JvmOverloads is called with less than the maximum number of arguments, that call is forwarded to a special synthetic method that fills in the missing arguments (in our example, this would likely be called register$default) and then calls the actual implementation of the method, which takes all of the arguments.
I encourage you to take a look at this mechanism by jumping into the generated bytecode, and decompiling it to Java! All of this is actually done in a very clever way, but we don’t need all those details for the purposes of this article.
Issues in the context of custom Views
Alright, with all that, let’s get into the Android context, and see how we could use this annotation when writing custom View implementations!
This is how you’d implement a custom View's constructors traditionally:
class CustomView : View {
    constructor(context: Context)
            : super(context)
    constructor(context: Context, attrs: AttributeSet?)
            : super(context, attrs)
    constructor(context: Context, attrs: AttributeSet?, defStyleAttr: Int)
            : super(context, attrs, defStyleAttr)
    constructor(context: Context, attrs: AttributeSet?, defStyleAttr: Int, defStyleRes: Int)
            : super(context, attrs, defStyleAttr, defStyleRes)
}
That is a lot of boilerplate to write for a Kotlin developer. This is how the same code could look like with @JvmOverloads, with just a single primary constructor that has default parameters:
class CustomView @JvmOverloads constructor(
        context: Context,
        attrs: AttributeSet? = null,
        defStyleAttr: Int = 0,
        defStyleRes: Int = 0
) : View(context, attrs, defStyleAttr, defStyleRes)
The overloads generated here will be found by the framework and called as expected, so this seems like a great shortcut to avoid having to write four separate constructors.
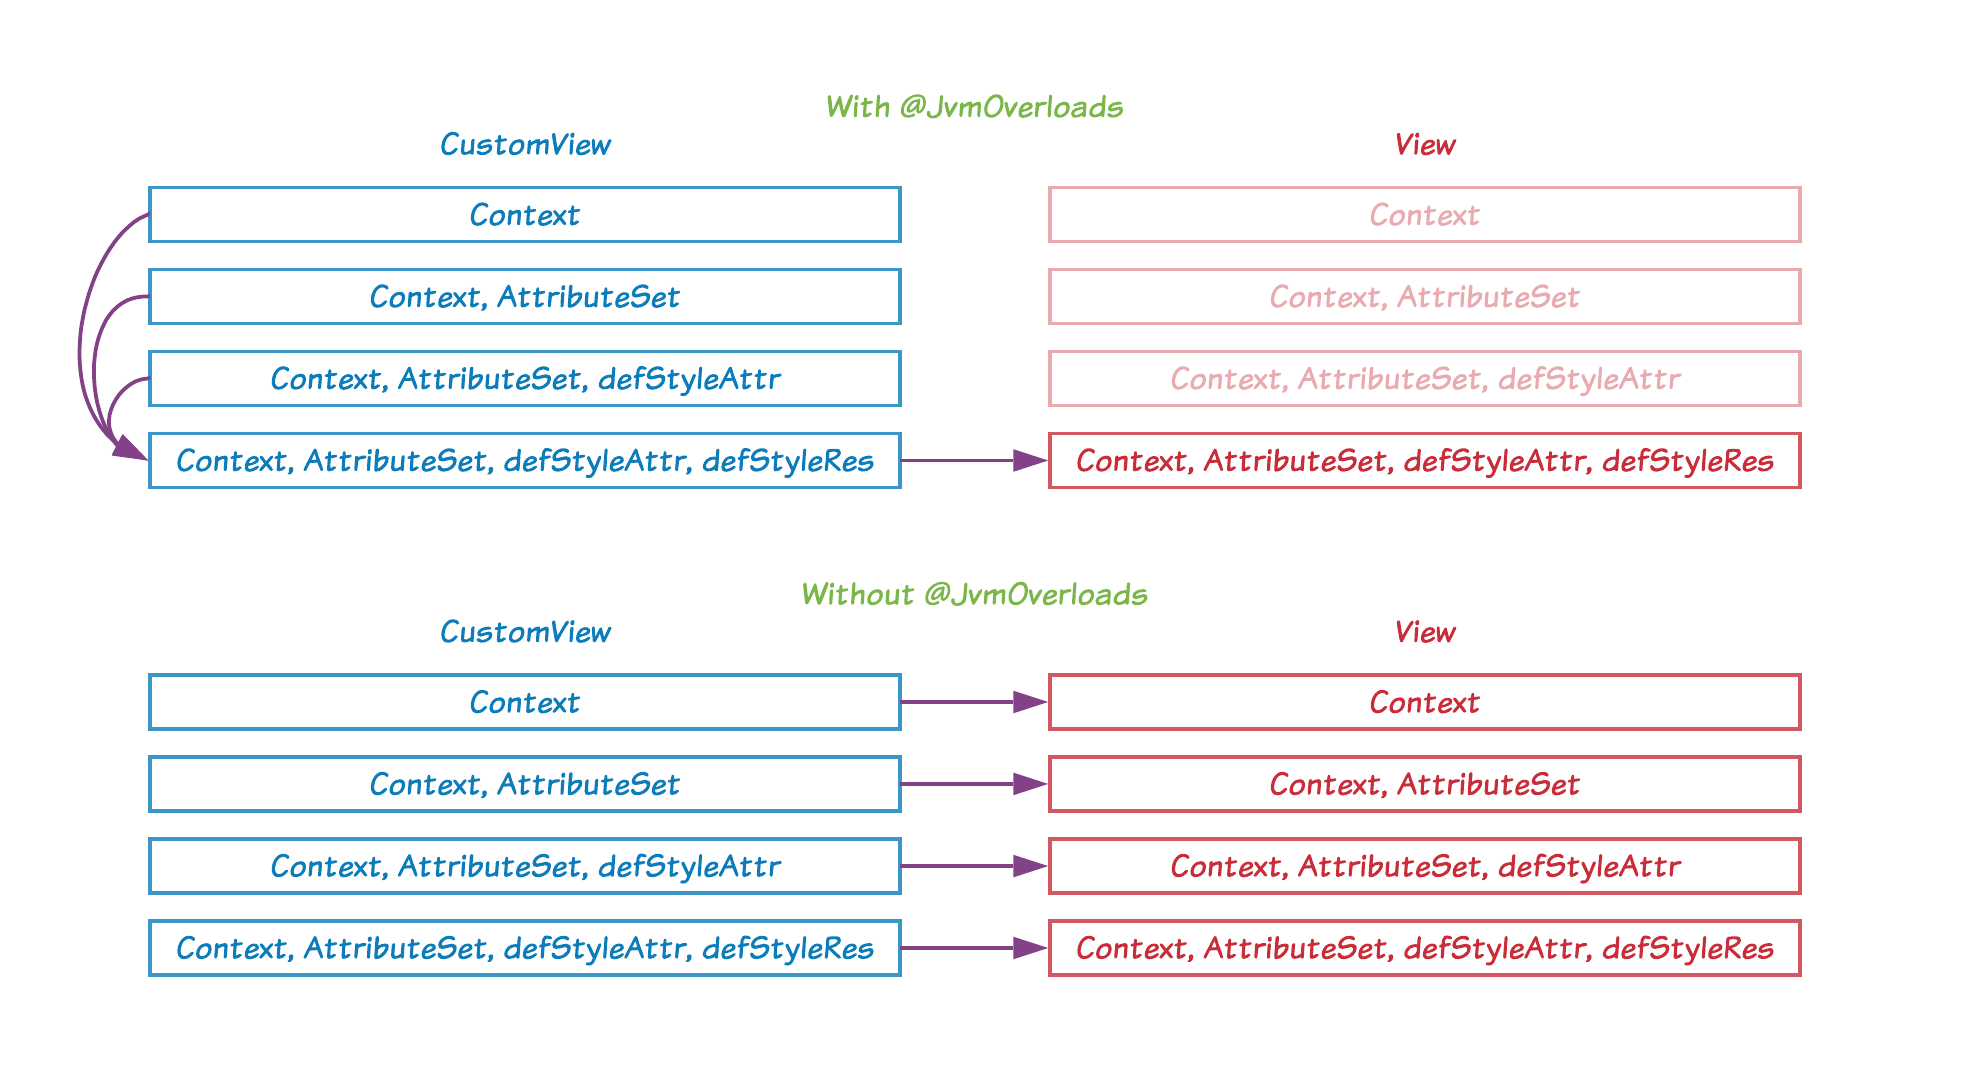
On first look, the two implementations above might seem equivalent, but there are some cases where they might produce different behaviour. Why?
-
The first implementation’s constructors all delegate to the respective
Viewconstructor which takes the same number of parameters as they did. -
The second implementation, in contrast, will first delegate within the class to the primary constructor implementation that takes all four parameters, which then calls the four-parameter constructor of the
Viewsuperclass. This means that this implementation always invokes the four-parameter constructor in the parent, and never any of the others.
The one, two, or three parameter constructors in whatever View you’re subclassing - this doesn’t have to be the base View class - might contain code other than just calling into their all-params constructor with default values. And even if they only do that, they might use default values other than the null, 0, and 0 you might have assumed!
Here’s all of this summed up visually, with the arrows marking the constructor delegation calls (click the image to view it full size).
Conclusion
Overall, you’re probably better off having the default View constructors ready for copy-pasting into any new custom Views you write. While it might not matter which implementation you go with most of the time, the one time it does, you’ll have a rather hard time tracking down what went wrong.
You might also like...
Wrap-up 2021
Another year over, a new one's almost begun. Here's a brief summary of what I've done in this one.
Retrofit meets coroutines
Retrofit's coroutine support has been a long time coming, and it's finally coming to completion. Take a look at how you can use it to neatly integrate networking into an application built with coroutines.
The conflation problem of testing StateFlows
StateFlow behaves as a state holder and a Flow of values at the same time. Due to conflation, a collector of a StateFlow might not receive all values that it holds over time. This article covers what that means for your tests.
All About Opt-In Annotations
Have you ever encountered APIs that show warnings or errors when you use them, saying that they're internal or experimental? In this guide, you'll learn everything you need to know about opt-in APIs in Kotlin: how to create and use them, and all their nuances.
